| File |
Load Markers from file |
Reads marker locations from a .LAN file which has been previously saved |
| Save Markers to file |
Writes marker locations to a .LAN file which can be re-loaded later
or writes the window text to a .TXT file for export. The type of save is
selected from the file save menu. There is also a .stl compatible lan mode.
When data are saved in .stl format a different frame of refence is used.
If the user wants landmarks compatible with the .stl file, this mode should
be used. Landmarks saved in .stl compatible mode will NOT load correctly
into this voxel software. |
| Markers to clipboard |
Writes marker locations in text format to the windows system clipboard.
They can be pasted from the clipboard into other software packages. |
| Orient |
absolute measurements |
When checked (default) x,y,z co-ordinates are displayed in data space
with 0,0,0 at the left (x), front (y) , top (z) corner of the data space
in the initial view. In the conventional CT slice view (from below) x is
across the slice (left to right), y is down the slice (top to bottom),
z is out through the stack of slices (top slice to bottom slice). |
| screen measurements |
When checked x,y,z co-ordinates are displayed relative to the current
view with 0,0,0 at the centre of rotation (and at the centre of the window).The
X-axis is horizontal with negative values to the left. The Y-axis is vertical
with negative values at the top. The Z-axis is out of the screen with negative
values at the back. Rotating or shifting the viewpoint will change the
co-ordinates displayed for a marker. |
| user defined measurements |
When checked x,y,z co-ordinates are displayed in a user
definable space. |
| Ref. point to centre |
Shifts the view to put the reference point marker at the centre of
rotation |
| Ref. line vertical |
Rotates the view so that the reference line appears vertical on the
screen, but is not necessarily parallel to it. |
| Ref. line horizontal |
Rotates the view so that the reference line appears horizontal on the
screen, but is not necessarily parallel to it. |
| Ref. line in screen |
Rotates the view so that the reference line becomes parallel to the
screen. |
| Ref. plane vertical |
Rotates the view so that the reference plane appears vertical on the
screen. |
| Ref. plane horizontal |
Rotates the view so that the reference plane appears horizontal on
the screen. |
| Ref. plane in screen |
Rotates the view to put the reference plane parallel to the screen. |
| Ref. plane standardised |
Rotates the view to put the reference plane parallel to the screen
and the reference line parallel to the screen x-axis. |
| Ref. plane 2 standardised |
Rotates the view to put the normal to the reference plane parallel
to the screen x-axis and the reference line pointing out of the screen. |
| Meas |
Radius of curvature |
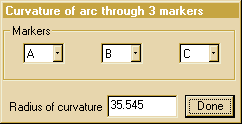 A
dialog box is displayed allowing the user to select 3 markers. The radius
of curvature of a circular arc passing through the 3 markers is calculated. A
dialog box is displayed allowing the user to select 3 markers. The radius
of curvature of a circular arc passing through the 3 markers is calculated. |
| Line - line information |
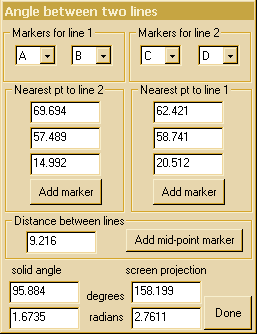 A
dialog box is displayed allowing the user to select 4 markers. The solid
angle (in 3 dimensions) between the two selected lines is calculated. The
angle subtended by projecting the two lines onto the plane of the image
is also calculated. This projected angle is viewpoint dependent. Selecting
A-B and A-B again will give a solid angle of 0 degrees/radians. Swapping
the order of points on one line (A-B and B-A) will give a solid angle of
180 degrees. Also displayed are the locations on each line of the nearest
point to the other line. Markers can be added at these locations by clicking
on the relevant buttons. The shortest distance between the lines is also
shown. A marker added halfway along this line is at the location nearest
to both lines.When the solid angle is close to 0 or 180 degrees, the lines
are nearly parallel. Under these conditions the marker locations should
not be relied upon because small errors in line position can cause large
movements of these locations. A
dialog box is displayed allowing the user to select 4 markers. The solid
angle (in 3 dimensions) between the two selected lines is calculated. The
angle subtended by projecting the two lines onto the plane of the image
is also calculated. This projected angle is viewpoint dependent. Selecting
A-B and A-B again will give a solid angle of 0 degrees/radians. Swapping
the order of points on one line (A-B and B-A) will give a solid angle of
180 degrees. Also displayed are the locations on each line of the nearest
point to the other line. Markers can be added at these locations by clicking
on the relevant buttons. The shortest distance between the lines is also
shown. A marker added halfway along this line is at the location nearest
to both lines.When the solid angle is close to 0 or 180 degrees, the lines
are nearly parallel. Under these conditions the marker locations should
not be relied upon because small errors in line position can cause large
movements of these locations. |
| Angle between planes |
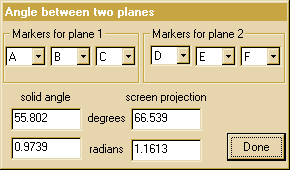 A
dialog box is displayed allowing the user to select 6 markers. The angle
between the two selected planes is calculated. Selecting A-B-C and A-B-C
again will give an angle of 0 degrees/radians. Swapping the order of points
on one triangle (A-B-C and A-C-B) will give an angle of 180 degrees.The
angle subtended by projecting the two plane normals onto the image is also
calculated. This projected angle is viewpoint dependent. A
dialog box is displayed allowing the user to select 6 markers. The angle
between the two selected planes is calculated. Selecting A-B-C and A-B-C
again will give an angle of 0 degrees/radians. Swapping the order of points
on one triangle (A-B-C and A-C-B) will give an angle of 180 degrees.The
angle subtended by projecting the two plane normals onto the image is also
calculated. This projected angle is viewpoint dependent. |
| Line - plane information |
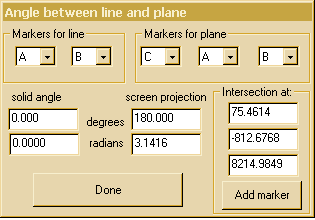 A dialog box
is displayed allowing the user to select 5 markers. The solid angle (in
3 dimensions) between the selected line and plane is calculated. The angle
subtended by projecting the line onto the plane of the image and the line
of intersection of the plane of the screen and the chosen plane is also
calculated. This projected angle is viewpoint dependent. The point of intersection
of the line and plane is shown in absolute co-ordinates. A marker may be
added at this location. When the solid angle is close to 0 or 180 degrees,
the line is nearly parallel to the plane. Under these conditions (as shown!)
the intersection is an unreliable location. A dialog box
is displayed allowing the user to select 5 markers. The solid angle (in
3 dimensions) between the selected line and plane is calculated. The angle
subtended by projecting the line onto the plane of the image and the line
of intersection of the plane of the screen and the chosen plane is also
calculated. This projected angle is viewpoint dependent. The point of intersection
of the line and plane is shown in absolute co-ordinates. A marker may be
added at this location. When the solid angle is close to 0 or 180 degrees,
the line is nearly parallel to the plane. Under these conditions (as shown!)
the intersection is an unreliable location. |
| Add Marker at XYZ |
This allows the user to add a marker at an arbitrary x,y,z position
in the current frame of reference. |
| Add mid-point marker |
A dialog box is displayed allowing the user to select 2 markers. Pressing
ok will add a new marker at the mid-point between the chosen markers. |
| Fit LSQ line to markers |
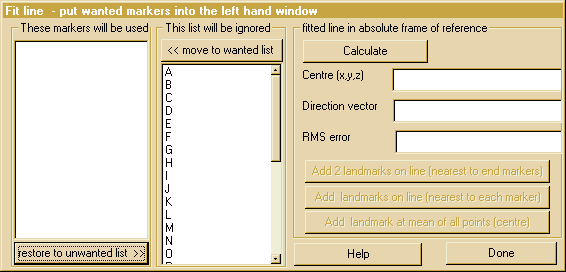
This option allows the user to fit the best (Least Square error) line through
the set of points selected in the left hand window of the dialog box. The
RMS error of the points to the line is reported. After Calculation,
extra landmarks can be added on this line using the buttons on the right
side of the dialog box or, by double clicking on any marker in the selection
windows, a new marker can be added on the line at the nearest point to
the clicked marker. Individual distances, from each point to the fitted
line, are diplayed in the selection windows, adjacent to each marker name,
after fitting. There is also an extra option to remove the worst fitting
point from the list and re-calculate. |
| Fit LSQ plane to markers |
This is similar to the option above but fits the best plane to the
selected set of points. After the plane has been defined, double clicking
on any marker in the selection windows will add a new marker on the plane
at the nearest point to the clicked marker. Individual distances, from
each point to the fitted plane, are diplayed in the selection windows,
adjacent to each marker name, after fitting.There is also an extra option
to remove the worst fitting point from the list and re-calculate.The data
set can be rotated to align the fitted plane with the plane of the screen. |
| Fit LSQ sphere to markers |
This is similar to the option above but fits the best sphere to the
selected set of points. After the sphere has been defined, double clicking
on any marker in the selection windows will add a new marker on the fitted
sphere at the nearest point to the clicked marker. Individual distances,
from each point to the fitted sphere, are diplayed in the selection windows,
adjacent to each marker name, after fitting.There is also an extra option
to remove the worst fitting point from the list and re-calculate. |
| Fit LSQ circle to markers |
This is similar to the option above but fits the best circle to the
selected set of points. This has to be a two stage process. First a best
fit plane to the points is found. Temporary copies of the selected points
are moved into this plane before finding the best fit circle. Individual
distances, from each point to fitted circle, are diplayed in the selection
windows, adjacent to each marker name, after fitting.There is also an extra
option to remove the worst fitting point from the list and re-calculate. |
| Length of polyline |
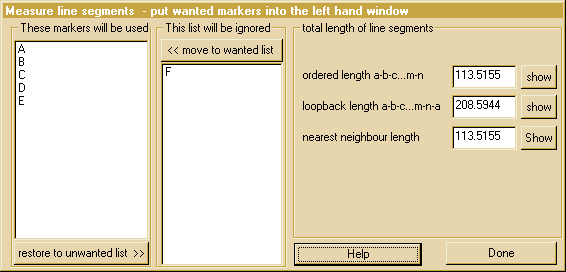
This calculates the length of a number of straight line segments between
markers. The first measure, ordered length joins all of the chosen
markers in their alphabetic order. Click on the show button to see the
measured line segments. The loopback measurement also adds in the line
segment from the last marker to the first marker. The nearest neighbour
option will not necessarily use all of the selected makers. Use the show
button to see the path actually used. Nearest neighbour finds the
pair of markers which are farthest apart and joins lines between these
and their nearest neighbours, using the markers in any appropriate order. |
| Del |
Select Markers to Delete |
Displays a popup allowing the user to select a list of markers to be
deleted. |
| Delete All Markers |
Clears the entire marker list |
| UnSet |
Clears plane, line & point attributes (one per click) |
| ? |
This Help |
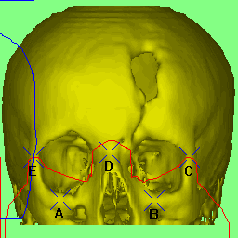 Markers can be placed on any visible surface at any orientation. Accuracy
of placement is improved if the image is rendered at high resolution; either
by use of the [hires] option or by zooming the region of interest with
the [resize] option. Maximising the window does NOT improve measurement
accuracy.
Markers can be placed on any visible surface at any orientation. Accuracy
of placement is improved if the image is rendered at high resolution; either
by use of the [hires] option or by zooming the region of interest with
the [resize] option. Maximising the window does NOT improve measurement
accuracy. 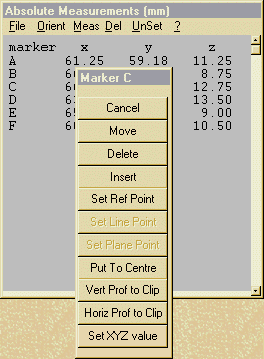 The
window initially displays x, y, z co-ordinates of the markers in absolute
measurements mode; where x=0, y=0, z=0 is at the left, front, top corner
of the data in the initial orientation. Units are mm (provided that the
header file contains valid information!).These co-ordinates are viewpoint
independent and will not change if the view is rotated or shifted. If the
screen measurements mode in the Orient menu is checked, then
co-ordinates are displayed in the frame of reference of the current view
with 0,0,0 at the centre of rotation. These co-ordinates will change with
viewpoint. If the user defined measurements mode in the Orient
menu is checked, then co-ordinates can be displayed in a
The
window initially displays x, y, z co-ordinates of the markers in absolute
measurements mode; where x=0, y=0, z=0 is at the left, front, top corner
of the data in the initial orientation. Units are mm (provided that the
header file contains valid information!).These co-ordinates are viewpoint
independent and will not change if the view is rotated or shifted. If the
screen measurements mode in the Orient menu is checked, then
co-ordinates are displayed in the frame of reference of the current view
with 0,0,0 at the centre of rotation. These co-ordinates will change with
viewpoint. If the user defined measurements mode in the Orient
menu is checked, then co-ordinates can be displayed in a 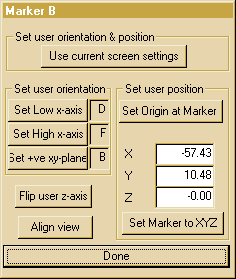 allowing
the user to define their own frame of reference for the co-ordinates displayed
by the marker window. This has a number of different controls for modifying
the frame of reference.
allowing
the user to define their own frame of reference for the co-ordinates displayed
by the marker window. This has a number of different controls for modifying
the frame of reference.